Difference between revisions of "Oxidation (Photosynthese)"
| Line 21: | Line 21: | ||
File:Messbox.jpg|3-D-gedruckte Messbox | File:Messbox.jpg|3-D-gedruckte Messbox | ||
</gallery> | </gallery> | ||
| + | |||
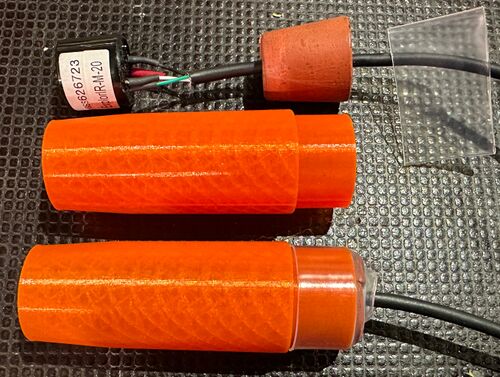
| + | Die Sensoren dieses Versuches sind recht teuer, pro Sensor ist mit ca. 150€ zu rechnen (Stand 09/2023). Sensoren in dieser Qualität sind jedoch nicht viel günstiger zu bekommen. Verwendet werden der LuminOX von [https://sstsensing.com/product/luminox-optical-oxygen-sensors-2/ SST Sensing], der manchmal etwas schwierig zu beschaffen ist, und der ExplorIR, auch von [https://sstsensing.com/product/explorir-m-ndir-co2-sensor/ SST Sensing]. Beim CO2-Sensor können für dieses Experiment auch günstigere Modelle verwendet werden, die bis 5000ppm messen können. | ||
Um die Sensoren vernünftig handeln zu können, wurden mithilfe eines 3-D-Druckers zwei Gehäuse und eine Messbox gefertigt. Die .stl-Files können gepackt in der folgenden Datei heruntergeladen werden: [[file:Photosynthese_housings.zip]]. | Um die Sensoren vernünftig handeln zu können, wurden mithilfe eines 3-D-Druckers zwei Gehäuse und eine Messbox gefertigt. Die .stl-Files können gepackt in der folgenden Datei heruntergeladen werden: [[file:Photosynthese_housings.zip]]. | ||
Revision as of 09:21, 30 September 2023
| Experiment | Oxidation |
|---|---|
| Category | Arduino library experiments |
| Used sensors | CO2 and O2 |
In diesem Experiment werden ein O2 und ein CO2-Sensor ausgelesen. Damit können Verbrennungsprozesse gemessen werden, was gerade bei Pflanzen im Biologieunterricht (Photosynthese) sehr interessant und vor allem gut messbar ist. Leider sind die Sensoren jedoch recht teuer.
Mit dem unten gezeigten Messaufbau lässt sich messen, wie sich in Abhängigkeit der Beleuchtungsstärke der Sauerstoff- und CO2-Gehalt in der Messkammer antizyklisch ändern. Die verwendete 9,5-W-LED war während der Beleuchtungsphasen nah über der Kresse positioniert.
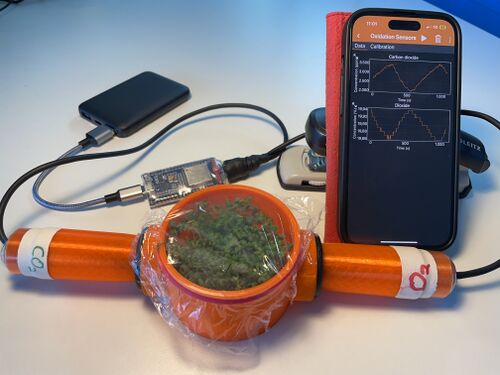
Messung der Photosythese von Kresse. Der CO2-Sensor war nicht perfekt kalibriert, weshalb der angezeigte CO2-Gehalt etwas zu hoch ist.

Aufbau
Einbau der Sensoren in die 3-D-gedruckten Gehäuse
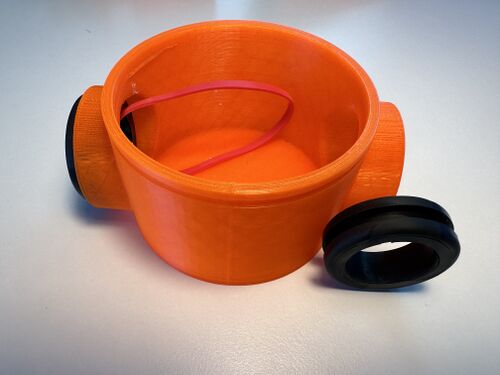
3-D-gedruckte Messbox


Die Sensoren dieses Versuches sind recht teuer, pro Sensor ist mit ca. 150€ zu rechnen (Stand 09/2023). Sensoren in dieser Qualität sind jedoch nicht viel günstiger zu bekommen. Verwendet werden der LuminOX von SST Sensing, der manchmal etwas schwierig zu beschaffen ist, und der ExplorIR, auch von SST Sensing. Beim CO2-Sensor können für dieses Experiment auch günstigere Modelle verwendet werden, die bis 5000ppm messen können.
Um die Sensoren vernünftig handeln zu können, wurden mithilfe eines 3-D-Druckers zwei Gehäuse und eine Messbox gefertigt. Die .stl-Files können gepackt in der folgenden Datei heruntergeladen werden: File:Photosynthese housings.zip.
Programmierung
Der ESP32 wird über die Arduino IDE programmiert. Es müssen die Definitionen für den ESP32 und die phyphox-Bibliothek installiert sein. Siehe dazu das Video unter Category: Arduino library experiments.
Es ist darauf zu achten, dass jeder ESP32 eine eigene Kennung hat (diese wird in ::start(ESP Voltmeter XY) festgelegt). Anschließend kann über das Plus-Symbol in phyphox ein Bluetooth-Experiment hinzugefügt werden, das Experiment wird dann automatisch geladen.
/* phyphox ESP32 for ExplorIR-M 20 (CO2-sensor) and LuminOX (O2-sensor)
  reads out values and sends them to phyphox, option to calibrate CO2 sensor
  https://www.gassensing.co.uk/product/explorir-m-co2-sensor/
  https://sstsensing.com/wp-content/uploads/2018/01/UG-001_LuminOx_UserGuide_rev2.pdf
  AUTHOR: Niklas Westermann
  LICENCSE: CC0
*/

#include <HardwareSerial.h>
#include <phyphoxBle.h>

void receivedData();
int co2calibration = 0;
int co2calibrationOld = 0;

// Define serial ports
// PIN16 and PIN17 are officially, but most ports can be used,
// so 22 and 23 work too. Be careful when changing theses ports!
HardwareSerial explorPort(1);    //UART on ESP32 (PIN22 and PIN23)
HardwareSerial luminoxPort(2);   //UART on ESP32 (PIN16 and PIN17)

void setup() {
  // Setup serial ports and sensors
  Serial.begin(9600); // Port for serial output via USB
  Serial.println("Start ESP32...");
  explorPort.begin(9600, SERIAL_8N1, 22, 23); // ExplorIR on PIN22-TX and PIN23-RX
  luminoxPort.begin(9600, SERIAL_8N1, 16, 17); // luminOX on PIN16-TX and PIN17-RX
  explorPort.print("K 2\r\n"); // Set sensor to polling (mode 2)
  luminoxPort.print("M 1\r\n"); // Set LuminOX to polling (mode 1)

  // Setup phyphox
  PhyphoxBLE::start("Oxidation Sensors");
  PhyphoxBLE::configHandler=&receivedData;

  // Experiment
  PhyphoxBleExperiment oxidation;
  oxidation.setTitle("Oxidation Sensors");
  oxidation.setCategory("ESP32 Experiments");
  oxidation.setDescription("Read O2 and CO2 Sensors");

  // Views
  PhyphoxBleExperiment::View graphView;
  graphView.setLabel("Data");
  PhyphoxBleExperiment::View calibView;
  calibView.setLabel("Calibration");

  // Graphs
  PhyphoxBleExperiment::Graph co2Graph;
  co2Graph.setLabel("Carbon dioxide");
  co2Graph.setLabelX("Time");
  co2Graph.setLabelY("Concentration");
  co2Graph.setUnitX("s");
  co2Graph.setUnitY("ppm");
  co2Graph.setChannel(0, 1);

  PhyphoxBleExperiment::Graph o2Graph;
  o2Graph.setLabel("Dioxide");
  o2Graph.setLabelX("Time");
  o2Graph.setLabelY("Concentration");
  o2Graph.setUnitX("s");
  o2Graph.setUnitY("%");
  o2Graph.setChannel(0, 2);

  // Edit
  PhyphoxBleExperiment::Edit calibration;
  calibration.setLabel("Sensor calibration");
  calibration.setUnit("ppm");
  calibration.setSigned(false);
  calibration.setDecimal(false);
  calibration.setChannel(1);
  PhyphoxBleExperiment::InfoField calibInfo;
  calibInfo.setInfo("To calibrate, enter the value of the actual carbon dioxide concentration. Outside, this should be 440ppm.");

  // Put together experiment
  graphView.addElement(co2Graph);
  graphView.addElement(o2Graph);
  calibView.addElement(calibration);
  calibView.addElement(calibInfo);
  oxidation.addView(graphView);
  oxidation.addView(calibView);          //attach view to experiment
  PhyphoxBLE::addExperiment(oxidation);  //attach experiment to server
}

void loop() {
  /* The ExplorIR outputs a string (in mode 1, streaming) with the following
    contents:
    "Z AAAAA z BBBBB \r\n" with AAAAA as the filtered value in ppm
    and BBBBB as the unfiltered value. This value has to be multiplied
    by the multiplier to get the real value in ppm (see below).
    To get the values, substring() and toFloat() are used, since there
    will be no changes in the output.
    Since we use mode 2, the "Z" command is send and then the answer processed
  */
  explorPort.print("Z\r\n");
  String explorValueStr = explorPort.readStringUntil('\n');
  Serial.print("Raw values explor: ");
  Serial.println(explorValueStr);
  float explorValue = explorValueStr.substring(3).toFloat();
  // The two commands below are only needed in combination with mode 1 (streaming)
  // and explorPort.available()
  //explorValue = explorValueStr.substring(3, 8).toFloat();
  //float explorValueUnfilt = explorValueStr.substring(11).toFloat();

  // To get the multiplier, a command is send
  explorPort.print(".\r\n");
  String explorMultiplierStr = explorPort.readStringUntil('\n');
  float explorMultiplier = explorMultiplierStr.substring(3).toFloat();

  // Now we multiply the value with the multiplier
  explorValue = explorValue * explorMultiplier;
  Serial.println(explorValue);

  /*
    LuminOX
    The luminox is put in polling mode above, the answer on "% \r\n" is
    "% xxxx.xx\r\n" so we need only the chars from place 3 and above
  */
  luminoxPort.print("% \r\n");
  String luminoxValueStr = luminoxPort.readStringUntil('\n');
  Serial.print("Raw values luminox: ");
  Serial.println(luminoxValueStr);
  float luminoxValue = luminoxValueStr.substring(3).toFloat();
  // The two commands below are only needed in combination with mode 1
  // and explorPort.available()
  luminoxValue = luminoxValueStr.substring(3, 8).toFloat();
  Serial.println(luminoxValue);

  // Send data to phyphox
  PhyphoxBLE::write(explorValue, luminoxValue);
  // In streaming mode, the sensors send a value every 500ms
  // to obtain stable values, we measure every second.
  // If higher measurement frequency is needed, change this here,
  // but be careful on too low values.
  delay(1000);
}

// Function to calibrate the co2 sensor
void receivedData(){
  float co2calibFloat;

  PhyphoxBLE::read(co2calibFloat);
  co2calibration = (int)co2calibFloat / 10; // TODO better handling for factor
  // only change if greater than 0 and a new (!) value
  if(co2calibration >= 0 && co2calibration != co2calibrationOld) {
    Serial.print("Calibration value: ");
    Serial.println(co2calibration);
    String calibMessage = "X " + String(co2calibration) + "\r\n";
    //Serial.println(calibMessage);
    explorPort.print(calibMessage);
    String explorAnswer = explorPort.readStringUntil('\n'); // Read answer
    //Serial.println(explorAnswer);
    co2calibrationOld = co2calibration;
  }
}
Auswertung
Probleme und Lösungen
Bei diesem Versuch kann es nach längerer Beleuchtung passieren, dass die Luftfeuchtigkeit zu sehr ansteigt und die angezeigte CO2-Konzentration stark verfälscht (erhöht) ist.