Difference between revisions of "Luftfeuchtigkeit und Lufttemperatur"
(Created page with "{{Infobox Experiment | Name = Luftfeuchtigkeit und Lufttemperatur | Category = Arduino library experiments | Sensors = SHT31 }} Auch wenn man für viele Beschleunigungsexpe...") |
|||
| (9 intermediate revisions by the same user not shown) | |||
| Line 4: | Line 4: | ||
| Sensors = SHT31 | | Sensors = SHT31 | ||
}} | }} | ||
| − | + | Für viele Experimente benötigt man ein kleines, zuverlässiges und schnelles Luftfeuchtigkeitsmessgerät. Ein weltweit verbreieter Standardsensor dafür ist der Sht31, der auch noch über ein empfindliches Thermometer verfügt. | |
| + | |||
| − | |||
| − | |||
| − | |||
| − | |||
<gallery widths=500px heights=400px> | <gallery widths=500px heights=400px> | ||
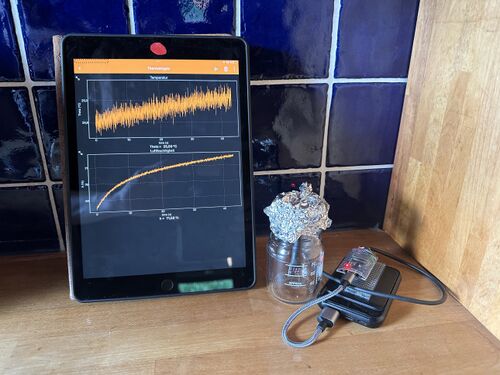
| − | File: | + | File:SHT31_2.jpg|Versuchsaufbau mit SHT31 |
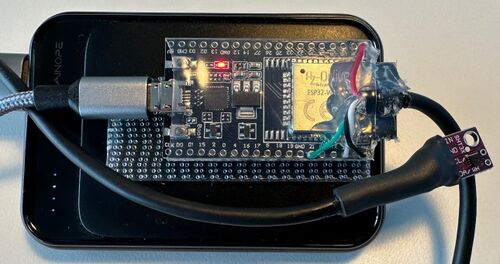
| − | File: | + | File:SHT31_3.jpg|Der SHT31-Sensor mit ESP32 im Detail |
</gallery> | </gallery> | ||
==Aufbau== | ==Aufbau== | ||
Die Verkabelung des Sensors ist wieder wie üblich: 3V3 – Vin, Gnd – Gnd, SCL – 22, | Die Verkabelung des Sensors ist wieder wie üblich: 3V3 – Vin, Gnd – Gnd, SCL – 22, | ||
| − | SDA –21. Als Stromversorgung dient hier einfach eine kleine Powerbank, auf die der ESP32 mit Doppelseitigem Klebeband befestigt wird. Der | + | SDA –21. Als Stromversorgung dient hier einfach eine kleine Powerbank, auf die der ESP32 mit Doppelseitigem Klebeband befestigt wird. Der SHT31 wurde über ein vieradriges Kabel mit dem ESP32 verbunden und am Ende alles mit Schrumpfschlauch versiegelt. Tipp: Als Kabel kann man z. B. ein nicht mehr benötigtes USB-Kabel verwenden. Sowas liegt häufig in größerer Anzahl rum. Und die Kabel sind meist angenehm flexibel. |
==Programmierung== | ==Programmierung== | ||
Der ESP32 wird über die Arduino IDE programmiert. Es müssen die Definitionen für den ESP32 und die phyphox-Bibliothek installiert sein. Siehe dazu das Video unter [[:Category: Arduino library experiments]]. | Der ESP32 wird über die Arduino IDE programmiert. Es müssen die Definitionen für den ESP32 und die phyphox-Bibliothek installiert sein. Siehe dazu das Video unter [[:Category: Arduino library experiments]]. | ||
| − | Es ist darauf zu achten, dass jeder ESP32 eine eigene Kennung hat (diese wird in ''PhyphoxBLE::start(" | + | Es ist darauf zu achten, dass jeder ESP32 eine eigene Kennung hat (diese wird in ''PhyphoxBLE::start("ThermoHygro01")'' festgelegt). Anschließend kann über das Plus-Symbol in phyphox ein Bluetooth-Experiment hinzugefügt werden, das Experiment wird dann automatisch geladen. |
<pre> | <pre> | ||
| − | |||
| − | |||
| − | |||
#include <phyphoxBle.h> | #include <phyphoxBle.h> | ||
| − | + | #include "Wire.h" | |
| − | + | #include "SHT31.h" | |
| − | + | #define SHT31_ADDRESS 0x44 | |
| − | |||
| − | |||
| − | |||
| − | + | uint32_t start; | |
| − | + | uint32_t stop; | |
| + | SHT31 sht; | ||
| − | + | void setup() | |
| + | { | ||
| + | PhyphoxBLE::start("ThermoHygro_01"); //Start the BLE server | ||
| + | //Experiment | ||
PhyphoxBleExperiment experiment; | PhyphoxBleExperiment experiment; | ||
| − | + | experiment.setTitle("ThermoHygro"); | |
| − | experiment.setTitle(" | ||
experiment.setCategory("Arduino Experiments"); | experiment.setCategory("Arduino Experiments"); | ||
| − | experiment.setDescription("Plot the | + | experiment.setDescription("Plot the Temperature and Humidity over time."); |
| − | + | //View | |
PhyphoxBleExperiment::View view; | PhyphoxBleExperiment::View view; | ||
| − | + | //Value | |
| − | //Graph | + | PhyphoxBleExperiment::Value Value1; |
| + | Value1.setLabel("Theta = "); | ||
| + | Value1.setUnit("°C"); | ||
| + | Value1.setChannel(1); | ||
| + | PhyphoxBleExperiment::Value Value2; | ||
| + | Value2.setLabel("h = "); | ||
| + | Value2.setUnit("%"); | ||
| + | Value2.setChannel(2); | ||
| + | //Graph | ||
PhyphoxBleExperiment::Graph graph1; | PhyphoxBleExperiment::Graph graph1; | ||
| − | graph1.setLabel(" | + | graph1.setLabel("Temperatur"); |
graph1.setUnitX("s"); | graph1.setUnitX("s"); | ||
| − | graph1.setUnitY(" | + | graph1.setUnitY("°C"); |
graph1.setLabelX("time"); | graph1.setLabelX("time"); | ||
| − | graph1.setLabelY(" | + | graph1.setLabelY("Theta"); |
graph1.setChannel(0,1); | graph1.setChannel(0,1); | ||
| − | |||
PhyphoxBleExperiment::Graph graph2; | PhyphoxBleExperiment::Graph graph2; | ||
| − | graph2.setLabel(" | + | graph2.setLabel("Luftfeuchtigkeit"); |
graph2.setUnitX("s"); | graph2.setUnitX("s"); | ||
| − | graph2.setUnitY(" | + | graph2.setUnitY("%"); |
graph2.setLabelX("time"); | graph2.setLabelX("time"); | ||
| − | graph2.setLabelY(" | + | graph2.setLabelY("h"); |
graph2.setChannel(0,2); | graph2.setChannel(0,2); | ||
| − | |||
| − | |||
| − | |||
| − | |||
| − | |||
| − | |||
| − | |||
| − | |||
| − | |||
| − | |||
| − | |||
view.addElement(graph1); //Attach graph to view | view.addElement(graph1); //Attach graph to view | ||
| + | view.addElement(Value1); | ||
view.addElement(graph2); //Attach graph to view | view.addElement(graph2); //Attach graph to view | ||
| − | view.addElement( | + | view.addElement(Value2); |
experiment.addView(view); //Attach view to experiment | experiment.addView(view); //Attach view to experiment | ||
PhyphoxBLE::addExperiment(experiment); //Attach experiment to server | PhyphoxBLE::addExperiment(experiment); //Attach experiment to server | ||
| − | + | Serial.begin(38400); | |
| − | + | Wire.begin(); | |
| − | + | sht.begin(SHT31_ADDRESS); | |
| − | + | Wire.setClock(100000); | |
| − | |||
| − | + | uint16_t stat = sht.readStatus(); | |
| − | |||
| − | |||
| − | |||
| − | |||
| − | |||
| − | |||
| − | |||
| − | |||
| − | |||
| − | |||
| − | |||
} | } | ||
| − | void loop() { | + | |
| − | + | void loop() | |
| − | + | { | |
| − | + | start = micros(); | |
| − | + | sht.read(); // default = true/fast slow = false | |
| − | PhyphoxBLE::write( | + | stop = micros(); |
| + | float temp = sht.getTemperature(); | ||
| + | float hum = sht.getHumidity(); | ||
| + | Serial.print(temp, 1); | ||
| + | Serial.print(" "); | ||
| + | Serial.println(hum, 1); | ||
| + | PhyphoxBLE::write(temp,hum); | ||
delay(10); | delay(10); | ||
} | } | ||
| + | |||
</pre> | </pre> | ||
==Arbeitsmaterialien== | ==Arbeitsmaterialien== | ||
| + | Das Agnes-Pockels-Labor der TU-Braunschweig hat ein gutes Arbeitsblatt zur Feuchtigkeit in Lebensmitteln entwickelt, wo der hier vorgestellte Sensor sehr gut eingesetzt werden kann: | ||
| + | https://www.tu-braunschweig.de/index.php?eID=dumpFile&t=f&f=141991&token=1885b8e910a2d558b6989a612d2b9623696dcf98 | ||
[[Category:Arduino library experiments]] | [[Category:Arduino library experiments]] | ||
Latest revision as of 11:25, 22 September 2023
| Experiment | Luftfeuchtigkeit und Lufttemperatur |
|---|---|
| Category | Arduino library experiments |
| Used sensors | SHT31 |
Für viele Experimente benötigt man ein kleines, zuverlässiges und schnelles Luftfeuchtigkeitsmessgerät. Ein weltweit verbreieter Standardsensor dafür ist der Sht31, der auch noch über ein empfindliches Thermometer verfügt.
Aufbau
Die Verkabelung des Sensors ist wieder wie üblich: 3V3 – Vin, Gnd – Gnd, SCL – 22, SDA –21. Als Stromversorgung dient hier einfach eine kleine Powerbank, auf die der ESP32 mit Doppelseitigem Klebeband befestigt wird. Der SHT31 wurde über ein vieradriges Kabel mit dem ESP32 verbunden und am Ende alles mit Schrumpfschlauch versiegelt. Tipp: Als Kabel kann man z. B. ein nicht mehr benötigtes USB-Kabel verwenden. Sowas liegt häufig in größerer Anzahl rum. Und die Kabel sind meist angenehm flexibel.
Programmierung
Der ESP32 wird über die Arduino IDE programmiert. Es müssen die Definitionen für den ESP32 und die phyphox-Bibliothek installiert sein. Siehe dazu das Video unter Category: Arduino library experiments.
Es ist darauf zu achten, dass jeder ESP32 eine eigene Kennung hat (diese wird in PhyphoxBLE::start("ThermoHygro01") festgelegt). Anschließend kann über das Plus-Symbol in phyphox ein Bluetooth-Experiment hinzugefügt werden, das Experiment wird dann automatisch geladen.
#include <phyphoxBle.h>
#include "Wire.h"
#include "SHT31.h"
#define SHT31_ADDRESS   0x44

uint32_t start;
uint32_t stop;
SHT31 sht;

void setup()
{
   PhyphoxBLE::start("ThermoHygro_01");          //Start the BLE server
//Experiment
    PhyphoxBleExperiment experiment;
    experiment.setTitle("ThermoHygro");
    experiment.setCategory("Arduino Experiments");
    experiment.setDescription("Plot the Temperature and Humidity over time.");

//View
    PhyphoxBleExperiment::View view;
//Value
    PhyphoxBleExperiment::Value Value1;
    Value1.setLabel("Theta = ");
    Value1.setUnit("°C");
    Value1.setChannel(1);
    PhyphoxBleExperiment::Value Value2;
    Value2.setLabel("h = ");
    Value2.setUnit("%");
    Value2.setChannel(2);
//Graph
    PhyphoxBleExperiment::Graph graph1;
    graph1.setLabel("Temperatur");
    graph1.setUnitX("s");
    graph1.setUnitY("°C");
    graph1.setLabelX("time");
    graph1.setLabelY("Theta");
    graph1.setChannel(0,1);

    PhyphoxBleExperiment::Graph graph2;
    graph2.setLabel("Luftfeuchtigkeit");
    graph2.setUnitX("s");
    graph2.setUnitY("%");
    graph2.setLabelX("time");
    graph2.setLabelY("h");
    graph2.setChannel(0,2);

    view.addElement(graph1);                 //Attach graph to view
    view.addElement(Value1);
    view.addElement(graph2);                 //Attach graph to view
    view.addElement(Value2);
    experiment.addView(view);               //Attach view to experiment
    PhyphoxBLE::addExperiment(experiment);  //Attach experiment to server

  Serial.begin(38400);
  Wire.begin();
  sht.begin(SHT31_ADDRESS);
  Wire.setClock(100000);

  uint16_t stat = sht.readStatus();
}


void loop()
{
  start = micros();
  sht.read();         // default = true/fast       slow = false
  stop = micros();
  float temp = sht.getTemperature();
  float hum = sht.getHumidity();
  Serial.print(temp, 1);
  Serial.print(" ");
  Serial.println(hum, 1);
  PhyphoxBLE::write(temp,hum);
  delay(10);
}
Arbeitsmaterialien
Das Agnes-Pockels-Labor der TU-Braunschweig hat ein gutes Arbeitsblatt zur Feuchtigkeit in Lebensmitteln entwickelt, wo der hier vorgestellte Sensor sehr gut eingesetzt werden kann: https://www.tu-braunschweig.de/index.php?eID=dumpFile&t=f&f=141991&token=1885b8e910a2d558b6989a612d2b9623696dcf98

